This post may contain affiliate links. If you click on a link and make a purchase, I may receive a small commission at no extra cost to you. Please read my disclaimer for more info.
The tie-dye trend is back and I’m not mad about it.
The girls have been wanting to tie-dye some things, so we bought this kit at Michael’s or you can get it from Amazon if you want it delivered right to your door. It has everything you need to dye several shirts/items.

Some tips for tie-dying with kids-
Relax and try not to worry about the giant mess they are going to make. Yes, I know this is easier said than done. Assume there will be spills, so make sure you and your kids are wearing clothes that you don’t mind getting ruined.
We did all of our tie-dying outside, which I highly recommend to keep from dying everything in your house. I put trash bags down on the back patio, so that the girls could tie-dye on top of the bags on the cement. They still got some dye on the concrete, but not too bad. It will come off eventually, right?
The kit we got came with gloves, but they were not ideal, so we ditched them really fast. Hands (and feet) were covered in dye. Relax. Don’t stress. (Me talking to myself during this process.)
Materials-
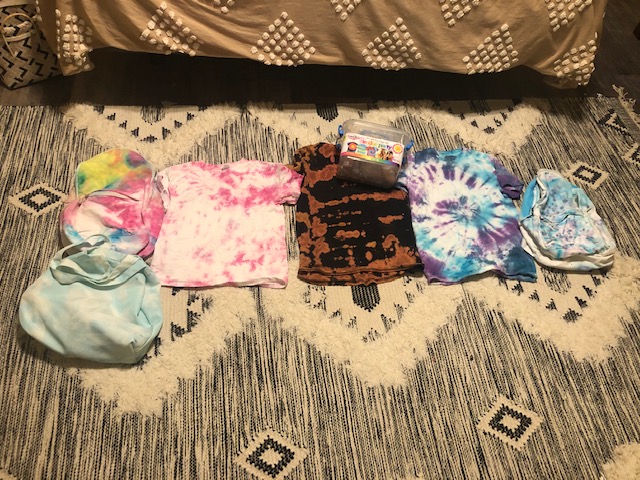
You will need whatever you want to tie-dye. We did t-shirts, a tote bag, and backpacks, all purchased from Michael’s. I washed all of the items first because the kit instructions said you should, and I think it makes the fabric more absorbent. Your items should be wet when you dye them, so no need to dry the items that are being tie-dyed once they come out of the washer (unless you’re doing reverse tie-dye, which I talk about later).
Our kit came with rubber bands and 18 dye powder squeeze bottles with 14 different colors. I love the squeeze bottles instead of dipping into the dye because they are less messy and easier to control.
How To Tie-Dye
Add water to your dye bottles and shake for at least a minute until the dye is fully dissolved. Make sure your shirts are wet.
Sadie tried the crumple pattern. You crumple the fabric until it’s in a tight mound. Hold it in place using 3 rubber bands. Squeeze your dye colors of choice on your shirt, applying a generous amount. Make sure you get both sides.
Sydni did the spiral method. With your thumb and forefinger, twist the center of your shirt (between the underarms) until it’s tightly wrapped. Use 3 rubber bands around the shirt to create 6 folds of equal sizes. Squirt the dye on each fold. Make sure to get both sides.
They just winged it with the tote bag and backpacks and squirted dye any which way. They still turned out cute. I don’t think it really matters what pattern you do-it all works!
Let the items sit for 8 hours, then rinse under cold water until water becomes colorless (leave rubber bands in place). My girls did this in the bathtub and I’m not gonna lie-the bathtub was a huge mess of color, but with some scrubbing, it came out.
Then, the fun part!
Take off the rubber bands to reveal your magnificent designs! It was so fun watching the girls excitement to see what they created! Wash your items (without other laundry so you don’t stain it) and let them air dry.
Reverse Tie-Dye Method
I wanted to try the reverse tie-dye method. I purchased a black shirt and instead of dye, for this method you use bleach.
Don’t make the same mistake I did. You do not wet your shirt for this method. I did and it never turned colors, so then I had to wait forever for it to dry. I used the fan design. Fold your shirt like a fan. Once you have a folded strip of shirt, fold it again in the opposite direction. Repeat until entire shirt is folded. Use 4 rubber bands to hold it in place.
I used a couple of empty dye bottles from our kit and filled them with bleach. Squirt the bleach on the shirt-front and back. It only takes a few seconds for the black to start turning orange. Once it’s the color of orange that you want, rinse your shirt thoroughly until the water runs clear. And you’re done! This method is a lot shorter than waiting the 8 hours for the dye to set and I’m happy with the way it turned out.

This isn’t the cheapest project you’ll find, but the girls had a lot of fun doing it, and it kept them off of their electronics. They will also get lots of use out of the items they created. If you try this project with your kids, remember-just take a deep breath and try to relax about the mess and watch their happy faces as they reveal their designs.


